How to Make an NPS your Radius Authentication Server for Cisco Device Admin Access
1. In NPS once you have your NPS server running, first add your client,
A. In the Server Manager, click on Roles > Network Policy and Access > NPS (Local) >Radius Clients and Servers > Radius Clients -à Click on New on the Right hand side of the window under Actions and you will get a window as follows:
B. Add your Friendly name for your device and the IP address, Add the Shared secret that you will also use as your Radius key in the Cisco devices


2. On the advance Tab either select Cisco or just leave it as Radius Standard as this does not really matter.

Click on Apply and then now we go to the interesting part.
3. Under Policies, you would want to create two policies:
I). Connection Request Policy
ii). Network Policy
Connection Request Policy
4. Click on Connection Request Policy and click on new under Actions:
On the window as below, Name your policy and click next

5. On the the next window you are going to set the conditions that are required for your devices to pass authorization :

6. Select One of the conditions that apply to your network, In mine I used the Client IPv4 Address so that I could use the wildcard and be selective on what range of IP address could get Authentication from the NPS.


Hit Ok and click next on to get the window below:

Hit next on this window as well:

Hit next and then finish on this window:

Now we go to the Network Policy and please follow this carefully as this can make or break your authentication and Authorization:
Network Policy
7. Click on the Network Policies and then new under the Actions:
8. Name your policy accordingly and click Next:

9. Now you have to add the conditions for your devices to be able to get Authenticated:
10. Click on ADD and you will get the following window and “Select User Group”, this is very important when you have an AD Group, let’s say Network_Admins:


Add the AD group that is supposed to have access to device management.
11. On the next window, select Access Granted


Hit next:
Unselect everything except Unencrypted authentication (PAP,SPAP)


Click No on the next annoying Windows help window:

Hit next and go to the Configure Constraints:
 Hit Next:

IMPORTANT:
12. On the following window, under Radius Attributes > Standard : remove the Framed-Protocol - PPP and then Edit the Service Type


This is a very important step as some Cisco devices will not work without this Attribute.
Now Click on the Vendor Specific :


Click on the Cisco-AV-Pair and then Add:


Click on Add and then type in the following to give your shell access level 15 access:
shell:priv-lvl=15
This attribute can be changed and applied to different groups i.e level 1 , 15
This attribute can be changed and applied to different groups i.e level 1 , 15
Note:
By default, there are three privilege levels on the router.
- privilege level 1 = non-privileged (prompt is router>), the default level for logging in
- privilege level 15 = privileged (prompt is router#), the level after going into enable mode
- privilege level 0 = seldom used, but includes 5 commands: disable, enable, exit, help, and logout
Close the window and hit next:
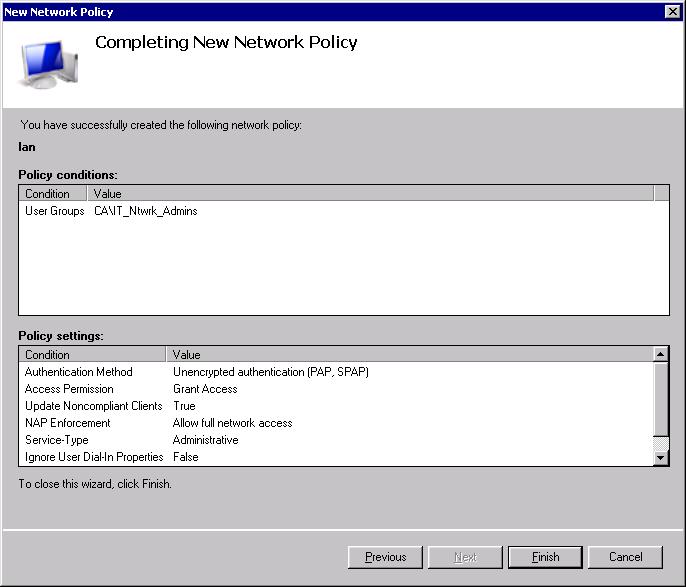
Hit finish on this window and now you have fully configured your NPS to be a radius server for your Cisco devices.
Cisco Configuration
For your Cisco devices this is all you need:
aaa authentication login default group radius local-case
aaa authentication login vty group radius local-case
aaa authorization exec default group radius local if-authenticated
aaa accounting system default start-stop group radius
!
ip radius source-interface Vlan1 <<<--- Configure the interface that has the IP address on the NPS Client
!
radius-server host <ip address of the NPS server> auth-port 1645 acct-port 1646
radius-server key <Key that was configured on the Radius client in the NPS>
!
line vty 0 4
login authentication vty <<<------- Make sure this is the same as in the aaa authentication login command
Please note that the privelege levels can be changed and applied according your needs:
See Cisco documentation here:
http://www.cisco.com/en/US/tech/tk59/technologies_tech_note09186a008009465c.shtml
This was a huge help, I was missing the if-authenticated on the aaa authorization line and the priv 15 stuff on the RADIUS server.
ReplyDeleteThe privilege level didn't work for me. It started working when i changed Service-Type to "NAS Prompt" (number 12 in the list).
ReplyDeleteThis is awesome dude. It works for me.
ReplyDeleteGlad it helped
Deletehow can i use encrypted authentication? as in step by step you showed "Unselect everything except Unencrypted authentication (PAP,SPAP)" but I want encrypted authentication instead.
ReplyDeleteMy cisco switch does not have the same aaa commands. Are there a "newer version" of these commands for newer switches?
ReplyDeleteI followed the same steps,but it`s not working for me. I tried on Cisco 2960-X with IOS version 15.2(4r)E3. Please help
ReplyDeleteThis works for Cisco 2960x and 3750x and 9200's
ReplyDeleteThis works for 2960s&x. They were production switches, I needed the line
ReplyDeleteaaa new-model
Before the other aaa commands. Thanks for the help